Monday, July 30, 2018

Fransiskus Sutris

VB.Net Tutorial Creating a Function Displaying Data From Table To Datagridview

The purpose of making this function is to facilitate and accelerate the making of the application, because every time you will display data from the table to the datagridview you simply call this function so there is no need to rewrite the long program code.

I hope you understand first how to create database and table in mysql.


  1. Create database with name: kampus_db and create table t_mahasiswa with structure below. please execute your sql script following:

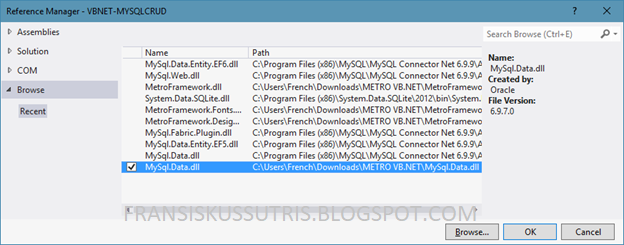
  1. Add Mysql.Data.dll in Project Reference
  1. Add a Module and name it Module1.vb, then copy the following program code :

  1. Please add Windows Form and leave the name Form2.vb, drag the datagridview control into form2, add the Button to the form2 as shown below:
  1. Double Click on control Button 1, then copy the following program code on sub Button1_Click :

The full program code in form2.vb is as follows :

  1. Please change the Startup Form on the project properties to Form2. Then try press F5 to run the program. When executed and Button1 is clicked then student data from table t_mahasiswa will appear in datagridview:

  1. So every time you will display data from table to datagridview just call the showDataToDGV function.
showDataToDGV(sql As String, tabelName As String, dgv As DataGridView)
Explanation Function showDataToDGV :
ParameterDescription
sqlsql query to read data with prefixed commands select
tableNameselected table names
dgvcontrol name datagridview which will be used to display data

Read More

Friday, July 27, 2018

Fransiskus Sutris

Tutorial VB.Net Membuat Fungsi Menampilkan Data Dari Tabel Ke Datagridview

Tujuan dari membuat fungsi ini adalah agar mempermudah sekaligus mempercepat pembuatan aplikasi, karena setiap kali anda akan menampilkan data dari tabel ke datagridview anda cukup memanggil fungsi ini sehingga tidak perlu menulis ulang kode program yang panjang.

Saya harap anda sudah memahami dahulu bagaimana membuat database dan table di mysql.
  1. Buat database dengan nama : kampus_db dan buat tabel t_mahasiswa dengan struktur di bawah ini. silahkan anda execute script sql berikut:

  1. Tambahkan Mysql.Data.dll dalam Project Reference
  1. Tambahkan Modul dan beri nama Modul1.vb, lalu kopikan kode program berikut :

  1. Silahkan tambahkan Windows Form dan biarkan namanya Form2.vb, drag control datagridview ke dalam form2, tambahkan juga Button ke dalam form2 seperti gambar berikut ini:
  1. Double Click pada kontrol Button1, lalu kopikan kode program berikut ini pada sub Button1_Click :

Kode program lengkapnya pada form2.vb adalah seperti berikut :

  1. Silahkan ubah Startup Form pada project properties menjadi Form2. Lalu coba tekan F5 untuk menjalankan programnya. Ketika dijalankan dan Button1 diklik maka data mahasiswa dari tabel t_mahasiswa akan tampil di dalam datagridview:

  1. Jadi setiap kali anda akan menampilkan data dari tabel ke datagridview cukup panggil saja fungsi showDataToDGV.
showDataToDGV(sql As String, tabelName As String, dgv As DataGridView)
Penjelasan Fungsi showDataToDGV :
ParameterDeskripsi
sqlsql query untuk membaca data dengan diawali perintah select
tableNamenama tabel yang diseleksi
dgvnama kontrol datagridview yang akan digunakan untuk menampilkan data

Read More

Monday, July 23, 2018

Fransiskus Sutris

MYSQL CRUD Using Custom Function In VB.Net (Part 3)

Step 2Back - Create Function For Insert, Update And Delete Data

Step 3: Testing The Function in Form1


  • Create Database exercise1
Create database on mysql. You can execute query below in your mysql management database :


  • Design Form1, Please design form like picture below:

  • Copy And Paste code below to your form1 code:


  • Run your project by press F5
  • You can test input and save data
Read More
Fransiskus Sutris

MYSQL CRUD Using Custom Function In VB.Net (Part 2)

Step 1: Create Function Connection to Database
Step 2: Create Function For Insert, Update And Delete Data

In Step 2 we will create function for insert, update and delete data from database.

  • Function For Insert Data

  • Function For Update Data


  • Function For Delete Data


Step 3: Next - Testing The Function In Form1
Read More
Fransiskus Sutris

MYSQL CRUD Using Custom Function In VB.Net

In this article I will share my way to Mysql CRUD using vb.net by creating custom functions. Why custom function, because this function I created itself to simplify and shorten the program to CRUD data from the database by calling the function. So we no longer need to type the insert, update and delete commands in the sql query.

Step 1: Create Function For Connect To Database

  • Open Visual Basic .Net
  • Create New Project
  • Add New Module (Right click on Project Name at Solution Explorer - Add - Module)
  • Let its name Module1.vb
  • Add to Reference : MySql.Data.Dll

Type codes below to Module1:


Step 2: Next - Create Function For Insert, Update And Delete Data
Read More

Tuesday, July 17, 2018

Fransiskus Sutris

General Error, hubungi Call Center Efaktur

Terjadi General Error saat menjalankan Efaktur Client


Saya akan berbagi bagaimana menjalankan Efaktur versi 2.1 pada sisi client jika terjadi error "General Error, hubungi Call Center Efaktur". Seperti terlihat pada gambar di bawah ini.

Atau bisa tonton tutorial videonya berikut ini :


Perlu diingat bahwa error ini terjadi pada sisi client dan bukan pada sisi server! jadi yang perlu kita lakukan adalah pada folder efaktur di komputer client.

Catatan : Terjadinya kegagalan/kehilangan data efaktur tidak menjadi tanggung jawab saya.

Langkah-langkahnya adalah sebagai berikut:
  • Lihat dan catat lokasi dari aplikasi efaktur di komputer client (ditempat saya lokasi nya saya taruh di D:\EFAKTUR V2.1\
  • Silahkan masuk ke direktory D:\EFAKTUR V2.1\
  • Silahkan Klik kanan di area yang kosong, lalu pilih New  > Text Document
  • Silahkan berinama file nya menjadi Efaktur.txt
BACA JUGA :
  • Silahkan buka file Efaktur.txt, lalu masukan perintah dos berikut:


  • Ingat! Lokasi D:\EFAKTUR V2.1\db" sesuaikan dengan lokasi dimana anda meletakan aplikasi efaktur.
  • Lalu silahkan simpan filenya dengan menekan CTRL + S
  • Silahkan keluar dari notepad
  • Lalu Rename File Efaktur.txt menjadi Efaktur.bat


  • Sekarang untuk menjalankan efaktur di komputer client anda cukup mengakses file Efaktur.bat tersebut.


Demikian sharing saya ini semoga bermanfaat bagi anda yang memerlukannya.


Read More

Thursday, July 12, 2018

Fransiskus Sutris

Jinitiator Not Working on Windows 7

Make sure the msvcr71.dll file is in the directory c:\windows\system32\

if the file does not exist then you can take it from another computer that has windows 7 operating system as well.
After that try your run again jinitiatornya.

Good luck.
Read More
Fransiskus Sutris

Jinitiator Not Working on Windows 7

Error when executing oracle jvm or jinitiator in windows 7.

Pastikan file msvcr71.dll ada di dalam folder c:\windows\system32\

jika file tersebut tidak ada maka anda bisa dari komputer lain yang memiliki sistem operasi windows 7 juga.

Setelah itu coba anda jalankan lagi jinitiatornya.

Semoga berhasil.
Read More